Here are the usage and functionality details for a Milky Way Lounge zero-gravity binocular chair:
Overview:
| Comfort | Relaxing for head, neck, upper and lower body; a sleep inducer! |
| User height/size | Adjustable for typical user heights and weights, including adults and teenagers. |
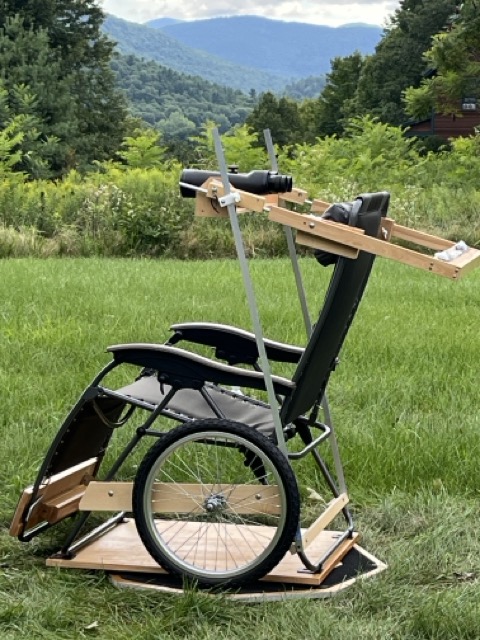
| Teeter | Fine adjustment of the viewing elevation, using one hand. Used in combination with the cradle below. |
| Binocular cradle | Used in combination with the teeter above. With the same hand, fine adjust the eye-to-binocular position. Useful with large changes in the viewing elevation. |
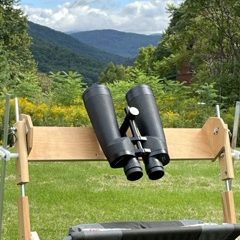
| Binocular cradle fulcrum | The cradle fulcrum options can be set to match the binocular’s center of mass. |
| Chair rotation | Easy smooth azimuth control with one hand while the other hand is controlling elevation. The large turntable bearing reduces tipping and wobbling. |
| Binocular weight balance | Adjustable with rear counterweights. It need not be exactly matched, due to added friction. |
| Chair backrest tilt | For coarse elevation changes. A zero gravity chair is best suited but a reclining lawn chair can be used. |
| Chair-front counter-weight | For weight-assisting when tilting the backrest of the loaded zero-gravity chair, and prevents the chair from tipping over. |
Functionality and stability:
| View direction stability | No drift, due to added friction for both azimuth control and elevation control. Also true when the hands are released, or when the ground is not completely level. |
| View direction bounce-back | After setting the view direction, there is almost zero bounce-back, due to choice of materials. |
| Head/eye positioning to binoculars | The eye’s distance to the binoculars and the angle with the binoculars are both adjustable. |
| Head/eye position as elevation changes | The eye position tracks very well with the binocular position. It can be pre-adjusted for head size, eyeglasses, and neck cushion thickness. |
| View settling time | Negligible, due to the stability rods. |
| Elevation drift | Negligible, due to the stability rods. |
| Body pulse vibration aka. “heartbeat”, seen in the view | Greatly reduced by the stability rods, and better in general with a sturdy chair. More noticeable on bright stars at high magnification, and less noticeable on extended objects. |
| Elevation extent | A zero gravity chair typically tilts back to about 15° from zenith. Then the teeter can tilt the binoculars up to zenith, as the neck is slightly arched. It is comfortable since a cushion is used behind the nape of the neck. |
| Tested with | 10×50’s, 16×70’s, 82mm 20-60x spotting scope |
Easy assembly:
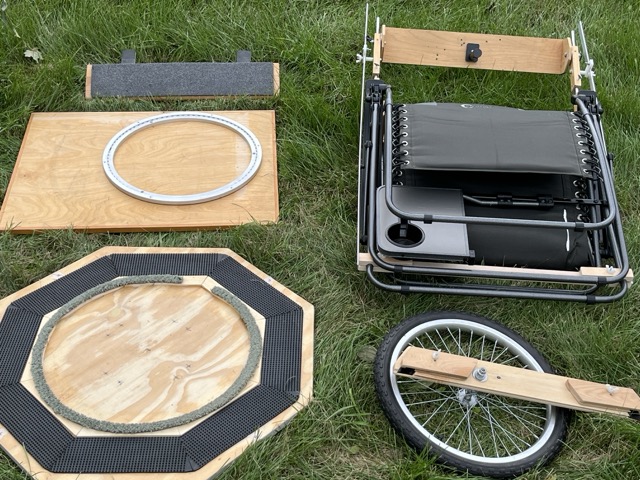
| Sections | Five to six sections; the heaviest and bulkiest section is the zero gravity chair itself. |
| Setup overview when the components are outside and ready | It takes a few minutes to set up: 1. Simply stack the two rotating base sections, 2. Place the chair (with the binocular holder pre-installed) onto the base, 3. Clamp on the chair front counterweight, and 4. Attach the wheel mount crossbar with two wingnuts. Video link. |
| Simple stacking of lower sections | The turntable bearing section (see pic below), is flipped over and simply sits in the friction cavity of the octagonal base. The chair is opened up with its binocular holder pre-installed, then placed on the four rubber guides on the top side of the bearing section. |
| Collapsible upper section | The zero gravity chair is collapsible with the teeter/cradle and stability rods pre-installed. Otherwise one can remove them by loosening the wing nuts. |
| Self-adjustable wheel mount | When clamping on the wheel mount crossbar, it conforms to the geometry of the chair frame, and self-adjusts to the required height off of the base track. |
Body strength to operate chair:
| Arm strength to operate azimuth and the fine elevation controls | little |
| Torso strength to tilt back a zero gravity chair | moderate |
| Leg/arm strength to return a zero gravity chair to upright | moderate |
| Strength needed to transport and assemble the sections | moderate |
Cost and commitment:
| Parts and materials | From recommended external sources; total ~US$275, excluding the zero gravity chair. |
| PDF plans | ~1/4 of the above number; discounts are also available. |
| Tools and safety supplies | Table saw, cross-cut saw, power drill, small belt sander, common hand tools. A router and a drill press are great but there are workarounds shown in the plans. Safety: dust mask, safety glasses, ear protection, ventilation for the finishing. |
| Parts acquisition and build time | A few days to acquire the parts, then a week or two to build and adjust the components. The plans accommodate your chair dimensions, but expect some trial and error as you fit your new components. |
This work © 2026 by Milky Way Lounge is licensed under CC BY-NC 4.0
Please follow and like us:
Leave a Reply